Safety Orientation: Foodservice Training Course Video Kit

Features

USB/DVD:
  • Physical product shipped to you. (Choice of USB or DVD)
  • Great for in-persona classroom training.
  • Unlimited use for entire organization.
  • Printable documentation for course included.
Streaming:
  • Great for in-person and virtual classroom training.
  • Unlimited use by 1 trainer/supervisor to train entire organization.
  • Convenient immediate access (no physical product is shipped).
  • Printable documentation for course included.
  • Auto-Renewal to alleviate the hassle of remembering to renew.

Whether you are a cafeteria line server, Certified Master Chef, dishwasher in the foodservice department of the local hospital, or maybe you just cook at home, kitchen safety training is something from which everyone that works in a kitchen setting can benefit.

Wet floors, knives, steamers, mixers, slicers, grinders, dish machines, hot surfaces and fryers are just a few of the potential hazards present in a kitchen setting. There are many opportunities for accidents and injuries to occur. This is especially true when the lunch or dinner “rush” is on. A small piece of lettuce on the floor can be a very dangerous slip hazard and even more so when everyone is rushing around and is less likely to notice it: That is, until someone slips on it and falls.

Our safety orientation for food service is designed to foster positive safety attitudes in the workplace and empower your employees to make good hazard management decisions.

Food Service Safety Orientation Training Class Topic Overview:

  • Slips, Trips & Falls
  • Lifting & Posture
  • Fire Safety
  • Burns
  • Electrical Safety
  • Chemical Safety
  • Knives, Slicers & Other Sharp Items
  • Personal Protective Equipment & Clothing
  • Housekeeping
  • First Aid

Our easy-to-use video kit provides all the necessary materials for running successful training with minimal prep, including:

  • 16 Minute Food Service New Employee Safety Orientation Training Video
  • Food Service New Employee Safety Orientation PowerPoint Presentation for classroom use
  • Printable documents, including:
    • Training outline
    • Compliance Manual
    • Completion Certificate & Wallet Cards / ID card
    • Attendance Log / Sign-In Form
    • Employee Quiz and Answer Key
    • Food Service Supplemental Documents

Course Outcomes

After completing this training, your workers will have a good foundation of knowledge of kitchen hazards and how to navigate food service work with safety in mind.

Who should take this course?
All new workers in food service. This training is also suitable for members of management, supervisors, to train the trainer and for refresher courses.

The following are free previews of the Safety Orientation for Food Service video training:

Safety Orientation – Foodservice Training Video Kit

Whether you are a cafeteria line server, Certified Master Chef, dishwasher in the foodservice department of the local hospital, or maybe you just cook at home, kitchen safety training is something from which everyone that works in a kitchen setting can benefit. Wet floors, knives, steamers, mixers, slicers, grinders, dish machines, hot surfaces and fryers are just a few of the potential hazards present in a kitchen setting. There are many opportunities for accidents and injuries to occur. This is especially true when the lunch or dinner “rush” is on. A small piece of lettuce on the floor can be a very dangerous slip hazard and even more so when everyone is rushing around and is less likely to notice it: That is, until someone slips on it and falls. Our safety orientation for food service is designed to foster positive safety attitudes in the workplace and empower your employees to make good hazard management decisions. Food Service Safety Orientation Training Class Topic Overview:

  • Slips, Trips & Falls
  • Lifting & Posture
  • Fire Safety
  • Burns
  • Electrical Safety
  • Chemical Safety
  • Knives, Slicers & Other Sharp Items
  • Personal Protective Equipment & Clothing
  • Housekeeping
  • First Aid

Our easy-to-use video kit provides all the necessary materials for running successful training with minimal prep, including:

  • 16 Minute Food Service New Employee Safety Orientation Training Video
  • Food Service New Employee Safety Orientation PowerPoint Presentation for classroom use
  • Printable documents, including:
    • Training outline
    • Compliance Manual
    • Completion Certificate & Wallet Cards / ID card
    • Attendance Log / Sign-In Form
    • Employee Quiz and Answer Key
    • Food Service Supplemental Documents

Course Outcomes After completing this training, your workers will have a good foundation of knowledge of kitchen hazards and how to navigate food service work with safety in mind. Who should take this course? All new workers in food service. This training is also suitable for members of management, supervisors, to train the trainer and for refresher courses.

Safer Food, Follow the Path Safety Poster

Some of the biggest health hazards for restaurants are due to the unsafe handling of food. This informational poster acts as the perfect daily reminder to employees of how to properly handle food to eliminate all potential risks and hazards.

“Follow the Path to Safer Food”

  • Keep Clean
  • Separate Raw and Cooked
  • Cook Thoroughly
  • Use Safe Water and Raw Materials

This full color, laminated, safety poster is 18″ x 24″ with English or Spanish options available.

Posted on Leave a comment

Equipping New Employees to Embrace Safety

Research shows that more than one-third of workplace injuries occur within the first year of employment. Those injuries account for one-third of workers’ compensation claim costs. “Safety training programs and practices should start before an employee’s first day and continue throughout the employee’s time at an organization,” said Chris Hayes, of Travelers Insurance. Clearly, it is critical that employers have clearly communicated practices and safety training programs in place. New employees must know who to go to with safety questions and concerns. Further, it is imperative that they are empowered to stop work with out fear of reprisal.

5 Ways to Equip All Employees

  1. Integrate Safety into the Hiring Process
  2. Onboard and Continuously Train Employees
  3. Conduct a Job Safety Analysis
  4. Implement an Accident Analysis Program
  5. Continue Supporting Employees Throughout Their Careers

It is vitally important to show new employees that your company takes safety seriously. For example, consider making it part of the performance evaluations for supervisors. “The most common mistake is not including risk and safety/health goals in the performance evaluation process for managers,” Scott Smith, director of safety management at Selective Insurance. “Having risk and safety/health goals for managers that impact their performance evaluation sets expectations and establishes the organization’s safety culture.” Another “significant, commonly observed mistake is management’s failure to intervene when they observe employees failing to follow sound risk management or safety,” he added. 

Additionally, how you manage injuries can significantly impact your business. Employers should be prepared before an injury takes place. Including having a plan that helps injured employees return to work as soon as medically appropriate. For example, a transitional duty program can help employees remain engaged and connected at work during their recovery.

When workers are injured, it might be possible to temporarily assign them to different tasks that are less physically demanding. “There are pros and cons to having an injured employee perform in a light-duty position while recovering,” Smith said. “They can stay engaged in the business during this interim period, which might help with overall absenteeism and maintain positive employee morale, as remaining workers will see the employee returning to work.”

A Transitional Duty Program Can Help in 3 Ways:

  1. Employees to receive prompt, quality medical care.
  2. Keep employees at work, allowing the company to get meaningful, productive work done while the employee recovers.
  3. The employee, employee’s medical provider, employer and insurance professional to work together to help the employee to return to work as soon as possible.

Following an injury on the job, it is important to have a plan for returning employees to work as soon as they are medically able to return.

According to Rich Ives, vice president of business insurance claims at Travelers Insurance, “We stress to our customers the importance of maintaining contact with the injured employee, checking on how they are feeling and setting up a modified duty program as they recover,” he added. “By focusing on what they can do, rather than on their pain or limitations, conversations about their return to work can help an injured employee stay engaged, feel productive and look ahead.” 

At NSC we provide a safety orientation course that is an excellent resource for new hires in any industry. It is designed to foster positive safety attitudes and raise awareness of potential workplace hazards and emergencies. Safety in the workplace starts with having the right attitude about safety and taking the right steps to prevent safety incidents. This training course is designed to make you aware of just a few of the possible hazards which you might encounter at work. It is a quick overview to provide you with some basic understanding of each area and to set you on the right path towards a safe and healthy work day. We also offer safety orientation courses specific to janitorial, construction, foodservice, and healthcare industries.

Posted on Leave a comment

LOTO: Lockout Tagout Safety Standards at Work

Lockout and tagout, also known as LOTO, is the OSHA standard for the control of hazardous energy. This exists to protect employees by addressing the necessary steps to disable machinery or equipment that could release hazardous energy or unexpectedly start. These hazardous energies, including electrical, hydraulic, pneumatic, chemical, thermal, or mechanical could seriously harm or kill workers if released during machinery work or maintenance.

Lockouts and tagouts put specific practices and procedures into place to isolate machinery energy hazards by de-energizing and locking out the ability to power on the equipment.

Failure to properly follow lockout tagout regulations are one of OSHA’s top 10 most frequent citations. Not only are there fines involved when you choose not to follow regulations but there are many dangerous situations you will create for your employees and anyone in your work environment.

Lockout/tagout procedures must be taken seriously. If procedures and requirements are not met employees can be gravely injured or killed by machinery and equipment. OSHA estimates that compliance with the lockout/tagout standards can prevent 120 fatalities and 50,000 injuries every year.

Training on Proper Lockout and Tagout Procedures  

Employees working on machinery are at high risk of bodily harm if someone removes lockout/tagout devices and reenergizes the equipment without their knowledge. It is extremely important that all employees respect lock out and tag out devices and that only the person who applied them may remove them.

According to OSHA’s guidelines, your lockout/tagout program must include energy control procedures, devices to lockout, inspections of lockout/tagout devices and mandated training for all employees. This training should be specific to each employee’s position and be relevant to their individual duties.

Proper training will give employees a better understanding of the types of energies that can cause danger and teach them how to implement procedures to ensure these energies are controlled during maintenance and service.

Training, and retraining regularly to maintain proficiency and protocol adherence, is crucial to the success of your Hazardous Energy Control Program.

Difference Between Lockout and Tagouts 

Although the terms lockout and tagout have similar desired effects, the two devices are quite different. Lock out devices hold hazardous energy in isolation and prevent machines from being energized with physical restraints that cannot be removed without a key.

On the other end of the spectrum, tag out devices simply warn employees against reenergizing devices while it is being serviced. These are much easier to remove, and as a result, they do not provide the same level of protection as lockouts.

Lock out and tag out kits provide bundles of both that can be used for multiple procedures. They contain tags, padlocks, and all other devices to isolate energy release. These allow companies to manage all their operations from a centralized box, which makes implementing a lockout tagout program easier. Lockout programs can be tricky and having all the effective tools makes all the difference.

Standards for Lockout Tagout

The OSHA standards for The Control of Hazardous Energy (Lockout/Tagout), Title 29 Code of Federal Regulations (CFR) Part 1910.147 and 1910.333 layout the requirements for disabling machinery during maintenance work and protecting workers from electrical circuits or equipment.

You must use a lockout program (or tagout program that provides protection levels equal to that achieved through lockout) whenever your employees engage in service or maintenance.  This system normally involves taking dangerous equipment completely offline and removing its ability to energize by locking it into an “off” position, then tagging it to the individual who placed the lock and who is the only person able to remove it.

The basic requirements as stated in the standards are as follows:

  • Employers must draft, implement, and enforce an energy control program and procedures.
  • A lockout device, which temporarily disables machinery so that hazardous energy cannot be released, must be used if the machinery supports it. Otherwise, tagout devices, which are warnings to indicate that the machinery is under maintenance and cannot be energized until the tag is removed, can be used if the employee protection program provides equal protection to a lockout program.
  • Lockout/Tagout devices must be protective, substantial, and authorized for the machinery.
  • All-new, refurbished, or overhauled equipment must be capable of being locked out.
  • Lockout/tagout devices must identify each user and only the employee who initiated the lockout can remove it.
  • Effective training must be provided to all employees who work on, around, and with heavy machinery and equipment to ensure understanding of hazardous energy control procedures including their workplace’s energy control plan, their specific position’s role and duties within that plan, and OSHA requirements for lockout/tagout.
  • Training must be repeated once a year
  • Inspections must be performed of energy control procedures and initiatives.

Implementing a safe and effective lockout/tagout system is ultimately a task of the employer. It is the business’ responsibility to protect their employees from injury or death by providing them the tools, standards, procedures, and training to avoid hazardous workplace accidents.

Who Needs to Utilize Lockout Tagout(LOTO) PROCEDURES?

Lockout tagout procedures and training are necessary for all companies with equipment and facilities with hazardous energy. These are necessary both to meet OSHA guidelines and keep your employees safe.  

Some examples of workplaces that would require both LOTO procedures and training include:

  • A distribution center that utilizes equipment like forklifts and palletizers would need a lockout/tagout procedure set in place.
  • A bakery food manufacturer would need a lockout/tagout procedure for maintenance on their industrial oven and conveyor belts.
  • In the printing industry, if cleaning or maintenance duties on a press must be performed under machinery guards or in hazardous points.

When moving forward with building your lockout tagout procedures, keep in mind that not all employees will use the lockouts and tagouts. Only authorized personnel, meaning those trained on a company’s lockout tagout procedure can properly understand, apply, and follow procedure.

Regardless of whether or not they are considered authorized personnel and are using the lockout/tagouts, employees will still need to be trained. Any employees who operate the machines that will be serviced under lockout tagout or work in the area where lockout tagout is used will need to understand the purpose and seriousness of lockout tagout procedures.

Steps of Lockout Tagout

The general steps of lockout/tagout application require authorized personnel to perform a sequence of shutdown and inspection procedures. To initiate the LOTO and prepare for maintenance, you must:

Step 1: Inform the Workers

Before the machinery is shut down, all employees that work on or around the machine must be informed that the energy control procedures will be applied at a specific time. If anything changes, including the maintenance time or expected downtime, inform these employees.

Step 2: Power down the machine

Based on manufacturer guidance and your shutdown procedures, have an authorized employee turn off the machine.

Step 3: Isolate energy sources

Most equipment will have more than one source of energy. Any area of the machine that could be energized by electric, hydraulic, pneumatic, chemical, thermal, or mechanical power must be shut down by powering down switches or shutting valves.

Step 4: Add the lock and tag

At all of the previously identified energy sources that can be used to re-energize the machine, apply locks and tags with identification of the authorized employee who placed them. Only the employee who placed them is allowed to remove these tags.

Step 5: Release any stored energy and prepare the area

Some machines can retain stored energy even after a shutdown. Look for hazards like spring tension or venting gases and release them appropriately. Moving parts must be safely secured to protect maintenance workers and remain stable throughout the cleaning or repairs.

Step 6: Verify that energy is isolated

Authorized personnel must now double-check and verify all previous steps were completed successfully.

Once the maintenance is complete, the LOTO must be removed. The following steps must be followed to remove the tags safely:

Step 1: Inform the workers

Communicate to all area workers that the machinery will be re-energized at a specific time. Ensure that all equipment brought in for repairs is removed before turning the machine back on and all maintenance personnel are accounted for.

Step 2: Remove the locks and tags

Authorized personnel will now remove the tags they placed earlier. Each tag can only be removed by the person who placed it.

Step 3: Re-energize the machinery

At the appointed time, re-energize the machinery.

Lockout/tagout procedures are not only important for OSHA compliance, they are vital to employee safety. To ensure your program is working as intended, annual inspections of lockout/tagout procedures are required by OSHA. While employees aren’t required to have annual refresher training, all employees must be well-trained and able to follow protocol at all times. If knowledge gaps are found, employees change work positions or if new machinery is added to the workplace, refresher training is required.

At National Safety Compliance, we offer a number of different ways to train your employees on lockout tagout safety, lockout tagout devices, and online training modules here on Online OSHA Training, as well as more traditional employer-led training programs available on DVD, USB, or Digital Access on OSHA-Safety-Training.net.

All Access Pass (English-Spanish)

All Access Pass to all of our training videos and documentation. The following are the videos that are included both English and Spanish:

Title Run Time # PPT Slides
Aerial & Scissor Lifts:  Training 18:16 23
Aerial &Scissor Lifts:  Safe Use 20:51 29
Aerial Devices 20:08 28
Asbestos Safety 16:57 30
Back Safety 12:00 17
Back Safety:  Healthcare 13:42 13
Bloodborne Pathogens Safety 16:15 29
Bloodborne Pathogens:  Healthcare 16:15 29
Confined Space Entry 20:00 35
Confined Space Entry:  Construction 25:00 61
Crane Safety 17:50 30
Crane Safety:  Hand Signals 10:50 17
Crane Safety:  Rigging 14:21 18
Driving Safety 32:09 30
Drug & Alcohol Abuse:  Employees 14:55 25
Drug & Alcohol Abuse:  Managers 17:14 29
Electrical Safety 21:40 23
Emergency Planning 18:27 29
Ergonomics:  Industrial 20:34 18
Ergonomics:  Office 19:36 18
Excavation & Trenching 15:49 15
Eye Safety 25:53 17
Fall Protection 23:00 26
Fire Safety 20:51 16
First Aid Safety 21:36 18
Food Safety & Personal Hygiene 22:07 25
Forklift Load Stability 19:38 19
Forklift Safety 25:25 27
Forklift Safety:  Construction 25:25 27
Hand & Power Tool Safety 17:48 25
Hazard Communication Safety 20:39 17
Hazard Communication:  Chemical Labels 13:39 17
Hazard Communication:  Safety Data Sheets 12:25 17
Hearing Conservation 27:51 23
Heat Stress Safety 19:42 19
HIPAA Privacy & Security Rules 21:36 30
Incident Investigation 13:00 25
Infectious Disease Control 17:00 22
Ladder Safety 13:14 12
Lockout Tagout Safety 17:00 21
Machine Safeguarding 19:57 24
Office Safety 22:00 31
Personal Protective Equipment 24:00 24
Respirable Crystalline Silica 14:28 24
Respirable Crystalline Silica:  Construction 17:01 26
Respiratory Safety 30:00 30
Safety Orientation 21:12 19
Safety Orientation:  Construction 19:48 18
Safety Orientation:  Foodservice 16:55 20
Safety Orientation:  Healthcare 16:21 16
Safety Orientation:  Janitorial 15:08 14
Scaffold Safety 23:00 31
Sexual Harassment:  Employees 15:00 25
Sexual Harassment:  Managers 20:00 16
Slips, Trips, &  Falls:  Construction 22:33 18
Slips, Trips, & Falls 22:33 17
Welding Safety 20:17 23
Workplace Violence 27:12 25

Products

With a wide range of safety training products and resources, National Safety Compliance is a go to source for training and compliance needs. Our products include video training kits, online courses, DVDs/USBs, streaming subscriptions, and safety posters. Training resources cover various topics such as aerial lift safety, asbestos hazards, bloodborne pathogens, confined space entry, crane safety, drug and alcohol abuse, electrical safety, emergency planning, ergonomics, excavation and trenching, eye safety, fall protection, fire safety, first aid, food safety, forklift safety, and more.

Posted on 1 Comment

4 Simple Steps to Train Your New and Returning Employees

UPDATE:Our Complete Infectious Disease Control Training Program Is Now Available

As your workforce returns from the coronavirus closures, it’s a good time to be proactive about your training needs for the remainder of 2020. Proper training ensures that your team will be safe and ready to resume working at peak efficiency. If you haven’t already read it, you may also want to read our guide on How to Prepare Your Office to Reopen.

National Safety Compliance has a variety of training resources that can be tailored precisely to your needs: online courses, booklets, posters, signage and much more.

Forklift driver wearing a safety mask to avoid coronavirus infection and transmission
Forklift Driver Wearing PPE

Here are some of the many ways that employee training helps your business succeed:

  • Higher productivity – When employees are well-trained, both the quantity and quality of their work improves.
  • Greater job satisfaction – Employees who receive excellent training have higher morale and greater loyalty to your organization.
  • Less supervision required – Well-trained workers spend far less time asking their supervisors for instruction and clarification.
  • Fewer accidents – Highly trained employees are less likely to experience accidents at work.
  • More opportunities for promotion – Well-trained workers are better candidates for promotion and are less likely to leave.

Here are 4 easy steps for jump-starting your employee training efforts:

#1 – Determine Which Training Method Works Best For Your Budget and Schedule

Woman using onlineoshatraining.net for workplace training
Online Training is a Great Way to Train Employees Remotely
  • Online training – This option lets employees learn at their own pace on their own schedule, either at home or on the job site. Explore some of the many online courses we offer on our Online OSHA Training LMS site.
  • Employer-led training using a National Safety Compliance training kit – This option lets you train all your employees for one low price. Each kit includes a video, trainer’s manual, PowerPoint presentation, compliance guide, employee quizzes, printable certificates, wallet cards, and more. These kits are available on DVD, USB, or instantly online via our Digital Access offering. Here is an example of our popular forklift training kit.
  • On-site instructor – This is the most expensive solution, where an instructor conducts training in-person at your facility.

#2 – Identify Your Industry And The Specialized Training Required

Food Service, Like Many Other Industries, Requires Specialized Training

Some training is applicable to all industries, such as proper hand-washing, sexual harassment prevention, safe lifting and back safety, and fire safety.

Here are some popular National Safety Compliance training kits for specific industries:

This is by no means an exhaustive list. If you have a question about the training kits most applicable to your industry, please contact us.

#3 – Schedule Your Training Sessions

Online training is easy to schedule because all the work is done by computer. Employees can study either at home or in one of your offices. This is a popular option for employees currently working from home who are preparing to return to the workplace or on-boarding for a new position.

An employee taking an online safety training course
Employee Completing an Online Training Course on onlineoshatraining.net

Employer-led training can take place at your convenience. Make sure to practice safe social distancing when conducting on-site training. It’s a good idea to offer separate 1-hour sessions so employees can retain the material better.

#4 – Verify And File Test Completion Certificates

Most federal and state regulatory organizations require you to keep test results on file for each employee.

According to the Association for Talent Development, companies that offer comprehensive training programs enjoy 218% higher income per employee than companies without formal training programs. These companies also have a 24% higher profit margin than those who spend less on training.

As your company gradually resumes normal operations, now is the perfect time to proactively explore training opportunities for both new and returning employees. Call us today at 877-922-7233, send an e-mail to sales@nscemail.com, or use the chat function to learn more about our productivity-boosting training kits and online training courses.

Posted on Leave a comment

The ABC’s of Hazardous Material Identification and Handling 

A person holding a pen and a clipboard. With safety sign graphics floating.

The term hazardous materials, or hazmat for short, may signify chemical suits, gas masks, and decontamination processes. Many people assume hazardous materials are exclusive to very specific industries, like chemical plants or laboratories.  

In reality, hazardous materials are all around. They are found in most workplaces, and most people have some in their homes. Household cleaning products like bleach, drain cleaners, oven cleaners, and solvents are all classified as hazardous materials. Even pressurized items like aerosol cans and propane gas canisters are considered hazardous materials.  

We all work and live around hazardous materials every day. So, it’s important to know the ABC’s of how to identify and handle them – especially for unfamiliar materials. Even if a hazardous material doesn’t appear to present an imminent threat, improper handling or storage can create a dangerous and potentially deadly situation.  

To stay safe in the workplace, or anywhere hazardous materials can be found, it’s critical to keep these three “ABC” reminders in mind. 

A – Awareness of Classification Levels 

B – Be Informed for Proper Identification  

C – Careful Handling, Storage, and Disposal 

Awareness of Classification Levels 

At the most basic level, a hazardous material refers to any substance or mixture that possesses properties capable of causing harm to human health, the environment, or property under the right conditions. That being said, the term eludes definition to an extent; best practice is to assume that all unknown materials are potentially hazardous. 

In the U.S., hazardous materials are officially classified and managed by the Department of Transportation (DOT), working in conjunction with organizations such as the Occupational Safety and Health Administration (OSHA) and the Environmental Protection Agency (EPA).  

DOT separates hazardous materials into nine different hazard classes based on their common properties and risks. There are hundreds of different materials that fall into these different categories.  

Each hazard class (which has its own subdivisions) includes specific regulations and requirements for packaging, labeling, marking, and documentation to ensure safe transport and storage. Hazard classes also have specific requirements for storage and disposal. While this is not the only classification used in the workplace, it’s the most commonly used one throughout the U.S. 

While these classes have unique requirements and regulations, they are not necessarily distinct when it comes to real-world application. Many materials fall into different classifications in different circumstances. For example, gasoline is primarily classified as a Hazard Class 3 due to its flammable nature. At the same time, it can also fall under Hazard Class 6 due to being a toxic substance. 

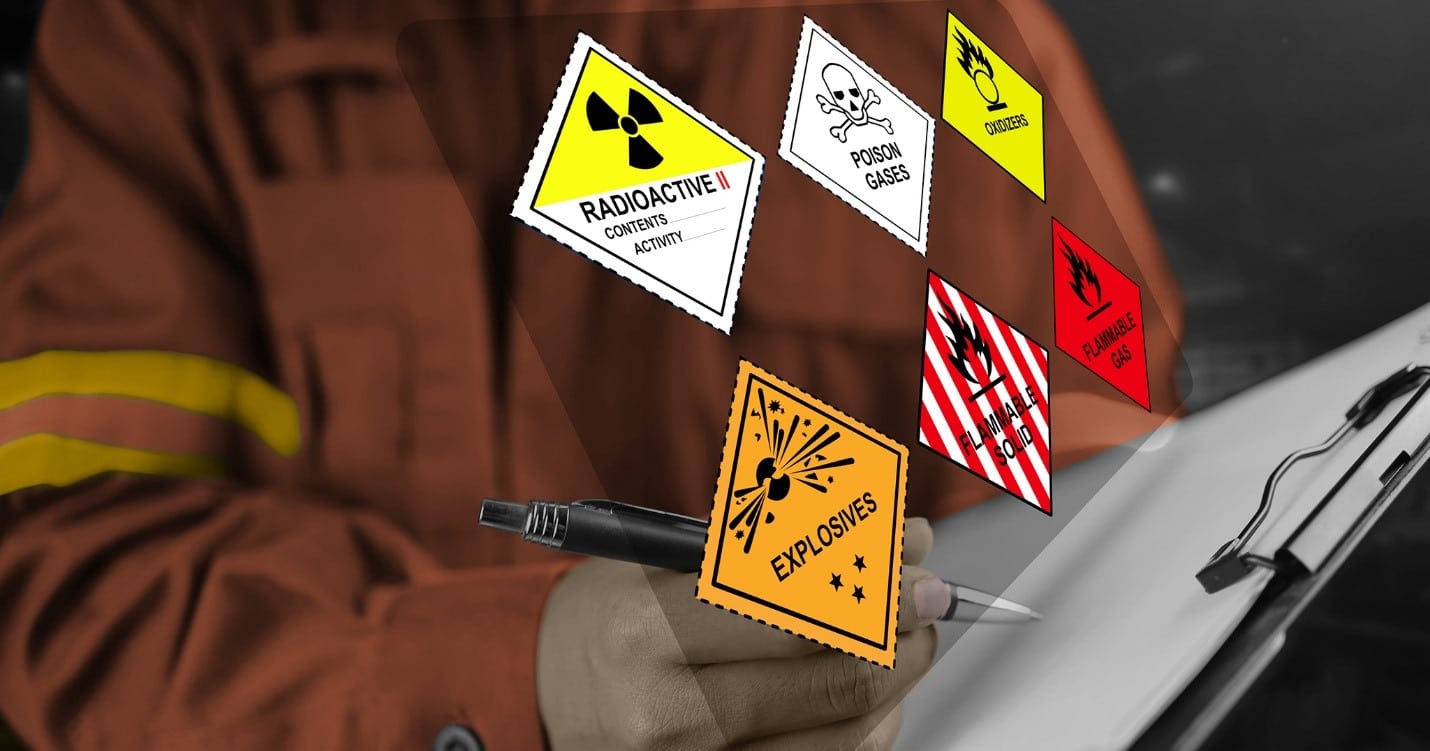
Hazardous Material Classifications  

  • Class 1: Explosives – This class includes materials that can rapidly release gasses, heat, and energy, causing an explosion. This class is subdivided into six divisions, including mass explosion hazards, projection hazards, and minor blast or fire hazards. All fireworks and ammunition fall under Class 1.  
  • Class 2: Gasses – This class includes all gasses, including those that are compressed, liquefied, or dissolved. Within this class, there are three divisions: flammable gasses, non-flammable gasses, and toxic gasses. Nitrogen, chlorine, and methane all fall under Class 2. 
  • Class 3: Flammable Liquids – Class 3 covers all flammable liquids, which are defined as liquids with a flashpoint below 100°F (or 140°F for construction materials). Gasoline, diesel fuel, paints, and certain solvents all fall under Class 3. 
  • Class 4: Flammable Solids – Class 4 covers solids that can easily ignite. This class is composed of three divisions: flammable solids, spontaneously combustible materials, and materials that emit flammable gasses when in contact with water. Matches, safety flares, magnesium, and white phosphorus are all Class 4. 
  • Class 5: Oxidizers and Organic Peroxides – Oxidizers and organic peroxides make up Class 5 of DOT’s hazardous materials classification. Oxidizers are substances that facilitate or support combustion, while organic peroxides are thermally unstable and can decompose. Hydrogen peroxide and ammonium nitrate fall under Class 5. 
  • Class 6: Toxic and Infectious Substances – This wide-ranging class includes materials that are toxic or pose a risk of infection. They are divided up into two types: toxic substances and infectious substances. Pesticides and herbicides, lead compounds, and biological samples are all considered Class 6. 
  • Class 7: Radioactive Materials – Perhaps the least likely to be encountered on a daily basis, Class 7 includes radioactive materials that emit ionizing radiation and require special handling and transport precautions. It’s divided into three types, based on levels of radioactivity and associated risks. Uranium, plutonium, and other radioactive materials all fall under Class 7.  
  • Class 8: Corrosive Materials – Corrosive materials are substances that can cause damage to people and materials they come into contact with through chemical reactions. Common examples include acids, bases, and certain cleaning agents. Many household cleaners are Class 8.   
  • Class 9: Miscellaneous Dangerous Goods – This catch-all category includes a variety of different materials, from lithium batteries and asbestos to other environmentally hazardous substances. Officially, all materials that have anesthetic, noxious, or other similar properties that could cause discomfort are Class 9.  

Be Informed of Proper Identification 

With nine different classifications and numerous subdivisions within each, it’s difficult for workers to fully understand every type of hazardous material and their unique regulations and requirements. 

While certain workplaces that regularly encounter a variety of hazardous materials require more robust identification training across all DOT classes – locations that employ first responders, truck drivers, and shipping personnel, for example – most workers do not encounter many unfamiliar hazardous materials on a day-to-day basis.  

Employers at workplaces like these should focus on providing employees with training and quick-reference information on hazardous materials specific to the job site. Being able to quickly identify a hazardous material will help keep employees safe. It can be the difference between maintaining a safe work environment and creating a perilous, and possibly deadly, situation.  

Safety Data Sheets (SDS) are the best way to keep employees informed about known hazardous materials that are kept on site. SDS provide quick reference information for each chemical at a workplace, their hazards, and the best guidelines for managing each chemical or material. National Safety Compliance (NSC) offers a training course video to help organizations align with best practices for creating, maintaining, and interpreting SDS. Of course, SDS information is only as useful as it is available. Worksite management and leadership should ensure these sheets are easily accessible at all times.  

It’s important to have SDS on-site, so employees know about hazardous materials, but it’s difficult for every employee to memorize them. Furthermore, employees may also encounter new materials from time to time. This is why it’s critical to provide training on how to read chemical labels. 

All hazardous materials are required to be properly labeled based on their DOT classifications, and in some cases, their subcategories. These labels include standardized symbols, pictograms, or codes. To the trained eye, this information explains everything a worker needs to know about a particular material. They explain the possible dangers and also provide information on how to manage accidents involving materials, such as an accidental discharge or release. Finally, they also explain the requirements for storage and disposal.  

There are additional communication requirements for workplaces that regularly handle hazardous materials. For example, chemical manufacturers need to understand and comply with OSHA’s Hazard Communication Standard. Organizations in these situations should use training materials specific to these requirements.   

Careful Handling, Storage, and Disposal 

When it comes to handling hazardous materials, the utmost caution should be used every time these materials are on the worksite – even if they aren’t being actively used.  

Storage and Labeling  

Hazardous materials should be stored in their original containers. Materials like corrosives can breach containers that aren’t designed for them, such as recycled food containers. Do not combine hazardous materials, including for storage.  

While the specific storage precautions should be taken based on each classification, most hazardous materials should be stored in dry, cool areas with good ventilation. Incompatible chemicals should not be stored near one another. Many hazardous materials can cause dangerous reactions when combined.  

Hazardous materials should be properly labeled. In fact, OSHA requires it: hazardous materials must be properly labeled based on their classification with SDS. Chemicals that are improperly marked or have missing labels should never be used. Workers should alert their manager if any potentially hazardous material is not properly labeled. If a material cannot be identified, it’s best to assume it’s hazardous. It’s a wise idea to take regular inventory of hazardous materials to ensure they are properly stored and labeled.  

Careful Handling 

Every hazardous material has its own requirements for personal protective equipment (PPE) when being directly handled. Read labels carefully and follow all handling requirements.  

Always have PPE like face masks, gloves, and goggles, ready and available for use. These materials should be inspected regularly to ensure they are in proper working order. Any old or defective PPE should be immediately replaced. Replace PPE if it becomes damaged or worn, and do not reuse disposable PPE. Cleaning areas should be clutter-free and regularly inspected. In addition, it’s recommended that workplaces have hand-washing and eye-wash stations installed, in the case of an emergency. For full PPE training, check out NSC’s video kit. 

Proper Disposal 

While each hazardous material has its own disposal requirements, many have a special disposal process. It’s a safe bet that the hazardous materials at a worksite cannot be simply sent to the landfill.  

Certain chemicals must be treated as part of the disposal process. Many cannot be poured down the drain or into the sewer system. Some hazardous materials may even need to be sealed into special containers, whereas others need to be sent to special facilities for disposal. 

Hazardous materials should be disposed of according to their specific label instructions and their classification. In some circumstances, there are also local regulations that apply. Before taking steps to discard any material, it’s critical to fully understand the disposal requirements based on the DOT classification and, if applicable, local, state, and federal regulations. To ensure compliance, keep records of all disposals. 

Next Steps 

There’s no time like the present to ensure a workplace is up-to-date with safety training, particularly when it comes to hazardous materials.  

NSC can serve as a partner for organizations looking to establish safety and compliance on all hazardous materials in the workplace. The HAZWOPER: Handling Hazardous Materials DVD outlines critical information regarding such materials, as well as what to do in the case of a spill, emergency or injury. 

Posted on Leave a comment

Excessive Noise Exposure in the Workplace

Worried about noise exposure on the job?  Work is one of the most common places people will be exposed to harmful levels of noise. Consequently putting them at risk of noise-induced hearing loss. Noise-induced hearing loss is permanent and often progressive. Indeed it often takes years to develop. That’s why it’s so essential to protect employees hearing throughout their working years. 

OSHA requires employers to determine if employees are exposed to excessive noise levels. It is estimated that 30 million workers in the U.S. are exposed to hazardous noise. When employees are subjected to excessive noise levels, administrative or engineering controls must be used. The incidence of noise-induced hearing loss can be reduced or eliminated through the successful application of engineering controls and hearing conservation programs. Where controls are not sufficient, employers must implement an effective hearing conservation program.

Exposure to Noise is measured in units of sound pressure levels called decibels, using an A-weighted sound level (dBA). There are several ways to control and reduce workers’ excessive noise exposure in the workplace. Engineering controls involve modifying or replacing equipment, or making related physical changes at the noise source or along the transmission path to reduce the noise level at the worker’s ear. Administrative controls are changes in the workplace or schedule that reduce or eliminate the worker’s exposure to noise.

Examples of inexpensive, effective Engineering Controls:

  • Choose low-noise tools and machinery
  • Maintain and lubricate machinery and equipment (e.g., oil bearings)
  • Place a barrier between the noise source and the employee (e.g., sound walls or curtains)
  • Enclose or isolate the noise source

Examples of Administrative Controls:

  • Operate noisy machines during shifts when fewer people are exposed
  • Limit the amount of time a person spends at a noise source
  • Provide quiet areas where workers can gain relief from hazardous noise sources
  • Control noise exposure through distance is often effective (Specifically, for every doubling of the distance between the source of noise and the worker, the noise is decreased by 6 dBA.)

According to the  U.S. Department of Labor, Bureau of Labor Statistics, there were 14,500 work-related hearing loss illness cases in private industry, in 2019. Roughly 75 percent of those injuries occurred in the manufacturing industry. Including 2,000 cases in transportation equipment manufacturing and another 1,800 in food manufacturing, and 11,400 in fabricated metal product manufacturing.

Some other jobs carry a high risk for hearing loss, such as:

  • Airline ground maintenance
  • Construction
  • Farming
  • Jobs involving loud music or machinery
  • Military jobs that involve combat, aircraft noise, or other loud noise posts

In order to provide the proper hearing protection, employees must have a good knowledge and understanding of noise exposure as well as protective measures. Furthermore, companies must have a solid hearing conservation program in place. Our Hearing Conservation Training Course includes all the necessary materials for running a successful training class. It is ideal for new hire orientation. Additionally, seasoned employees would benefit from refresher training. This training is also important for environmental health & safety managers, manufacturing managers and supervisors, construction managers, and anyone who works in or manages employees in a noisy environment. Furthermore, this training is suitable for use to train the trainer.